The DJI Mavic 3 Pro is a prosumer triple-camera drone — pairing a Hasselblad main lens with a medium tele and a tele camera — that gives consumer operators more coverage angles than any single-lens system. Creating a DJI Mavic 3 Pro 3D model requires more than pressing record: the right camera settings, a structured flight pattern, and a processing pipeline that can handle video-based reconstruction (videogrammetry, the process of deriving 3D geometry from overlapping video frames) determine whether the output is professional or unusable. This guide covers optimal settings for mapping — not cinematic work — and shows how SkyeBrowse's cloud workflow turns a Mavic 3 Pro flight into a deliverable 3D model without aerial photogrammetry expertise.

Key Takeaways
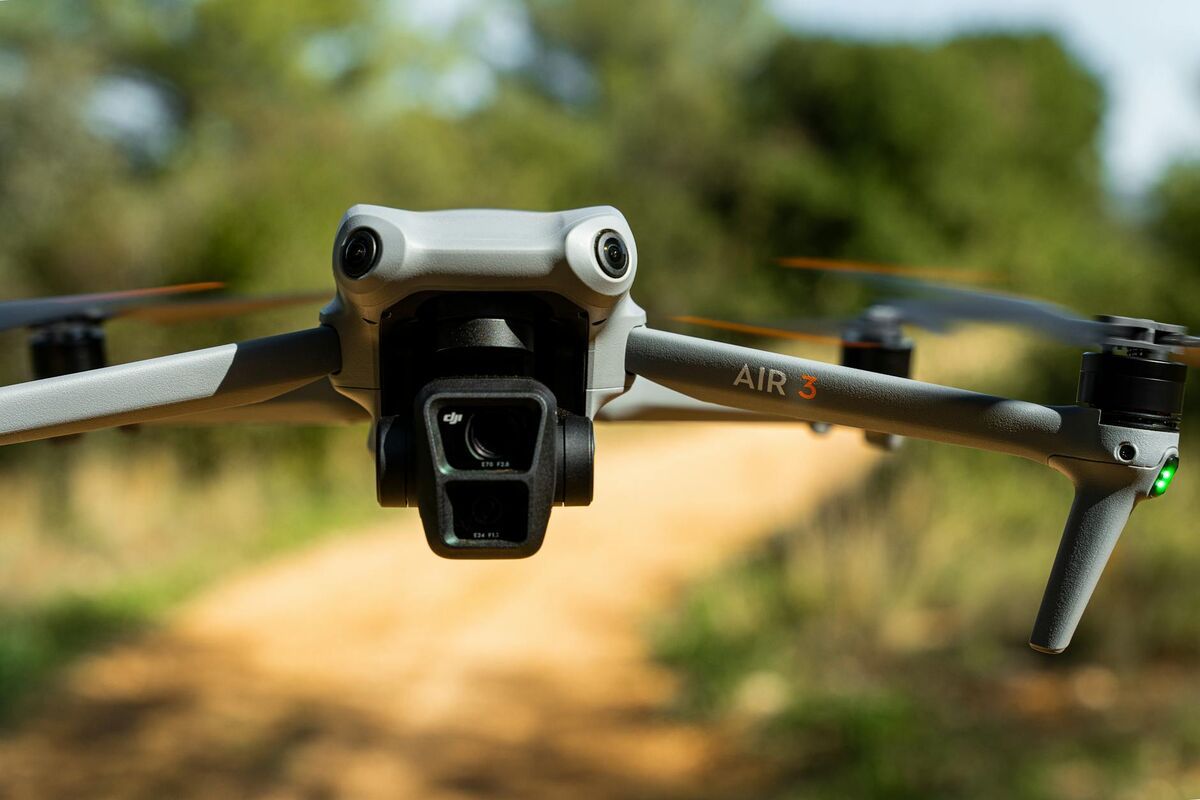
- The DJI Mavic 3 Pro's triple-lens system — Hasselblad main (24mm equiv.), 70mm medium tele, and 166mm tele — provides multi-angle coverage that produces denser point clouds than single-camera consumer drones.
- For 3D mapping flights, use 4K/30fps on the Hasselblad main lens, fixed ISO 100–400, and fly slower than 15 mph to maintain at least 80% frame overlap.
- SkyeBrowse's videogrammetry platform accepts Mavic 3 Pro .MP4 files and the companion .SRT telemetry file for georeferencing — no ground control points required for Lite-tier accuracy.
- The Mavic 3 Pro's 43-minute flight time means longer capture sessions, but SkyeBrowse keeps pace — processing completes in roughly the same time as the recording, producing GLB mesh, LAZ point cloud, and GeoTIFF orthomosaic outputs with no desktop GPU required.
- The Mavic 3 Pro bridges the gap between hobbyist drones and enterprise systems like the Mavic 3 Enterprise, making it a cost-effective entry into professional 3D documentation.
Contents
- Why does the Mavic 3 Pro's triple-lens system help with 3D reconstruction?
- What camera settings should you use for Mavic 3 Pro mapping flights?
- How do you fly the Mavic 3 Pro for maximum 3D model quality?
- How does SkyeBrowse process Mavic 3 Pro video into a 3D model?
- How does the Mavic 3 Pro compare to the Mavic 3 Enterprise for mapping?
- FAQ
Why does the Mavic 3 Pro's triple-lens system help with 3D reconstruction?
The Mavic 3 Pro carries three calibrated cameras on a single gimbal: a Hasselblad 4/3 CMOS main camera (equivalent to 24mm), a medium tele (70mm equiv., 1/2 CMOS), and a tele (166mm equiv., 1/2 CMOS). In a single nadir or oblique pass, the main camera captures the wide scene context while the tele lenses add higher-resolution texture and geometric detail at longer standoff distances. That multi-angle data gives reconstruction algorithms more overlapping viewpoints per flight, which typically produces denser point clouds and fewer data voids on complex surfaces.
Photogrammetry — the broader technique of deriving measurements and 3D structure from photographs — relies on matching the same physical point across many different images taken from different positions. More viewpoints means more tie points, and more tie points means more accurate geometry. Traditional single-lens consumer drones require the pilot to fly very slow grid patterns and capture still images at high overlap to compensate for having only one perspective per position. The Mavic 3 Pro partially solves that problem in hardware.
For structures with steep vertical faces — building walls, retaining walls, or accident scene barriers — the medium tele lens at 70mm can be pointed obliquely while the main lens captures nadir (straight-down) footage simultaneously during a single flight. This dual-angle coverage mimics the multi-camera rigs used on enterprise mapping platforms at a fraction of the cost. Per the ASPRS Positional Accuracy Standards for Digital Geospatial Data, adequate overlap and multi-angle capture are prerequisites for meeting mapping-grade accuracy thresholds.
See our full guide to how to make a 3D model with a drone for a broader overview of the reconstruction process.
What camera settings should you use for Mavic 3 Pro mapping flights?
For 3D mapping — not cinematic work — shoot the Hasselblad main camera in 4K at 30fps, set a fixed ISO between 100 and 400 in good daylight, keep shutter speed at 1/60 to 1/120, and set aperture to f/2.8 to maximize light intake. Disable D-Log M color profile unless you plan to color-correct before upload; flat color profiles can confuse feature-matching algorithms in processing software. Turn off any digital stabilization (EIS) that crops the sensor — optical gimbal stabilization is sufficient and preserves full frame data.
The most common mistake Mavic 3 Pro pilots make when shooting for 3D reconstruction is using cinematic settings: high D-Log M with 180-degree shutter rule, variable ND filters, and slow zoomed footage. Those choices optimize for color grading and motion blur in video, not for frame sharpness and texture detail needed by reconstruction algorithms. For mapping flights, prioritize:
- Shutter speed: 1/60 minimum; 1/100 or faster in midday light avoids motion blur on fast flyovers
- ISO: lock at 100 or 200 — noise in high-ISO footage degrades feature matching
- White balance: set to a fixed Kelvin value (e.g., 5500K) rather than auto, so color is consistent across all frames
- Resolution: 4K/30fps on the main Hasselblad lens; the medium tele adds useful detail for secondary passes
- Video format: use .MP4, not .MOV, as this is the format most compatible with cloud upload tools
- SRT telemetry: always enable SRT subtitle file recording in DJI Fly app settings — SkyeBrowse uses the embedded GPS, altitude, and gimbal data for georeferencing
The FAA's Remote ID rule requires broadcast Remote ID for operations under Part 107, which is the regulatory framework most commercial mapping operators use. Ensure the Mavic 3 Pro's firmware is current before flights to maintain Remote ID compliance.
How do you fly the Mavic 3 Pro for maximum 3D model quality?
Fly at a consistent altitude between 100 and 200 feet AGL, moving slower than 15 mph, in a lawnmower grid pattern with 70–80% side overlap between passes. For buildings and structures with vertical faces, add a perimeter orbit pass at a 45-degree gimbal angle after the nadir grid to capture wall texture. The Mavic 3 Pro's obstacle avoidance sensors help on the perimeter pass, but disable them in open field grid flights to prevent erratic speed adjustments that reduce frame overlap.
Flight altitude and speed are the two variables pilots most often get wrong. Flying too fast — above 20 mph — reduces the time each point on the ground is visible across consecutive frames, creating reconstruction gaps. Flying too high raises the ground sample distance (GSD), reducing detail. A good rule of thumb: at 120 feet AGL with the Mavic 3 Pro Hasselblad main camera, expect approximately 2–3 cm GSD, sufficient for most mapping, inspection, and documentation tasks.
For scenes with significant vertical relief — multi-story buildings, steep terrain, or cut slopes — use the medium tele camera (70mm) on a dedicated perimeter orbit at 100 feet, with the gimbal angled 30–45 degrees from horizontal. This data, combined with the nadir grid from the main lens, produces far more complete 3D geometry on vertical surfaces than a nadir-only pass.
When operating under Part 107, always check airspace via B4UFLY or an approved LAANC system before flight. Our complete drone mapping guide covers preflight planning steps in detail.

How does SkyeBrowse process Mavic 3 Pro video into a 3D model?
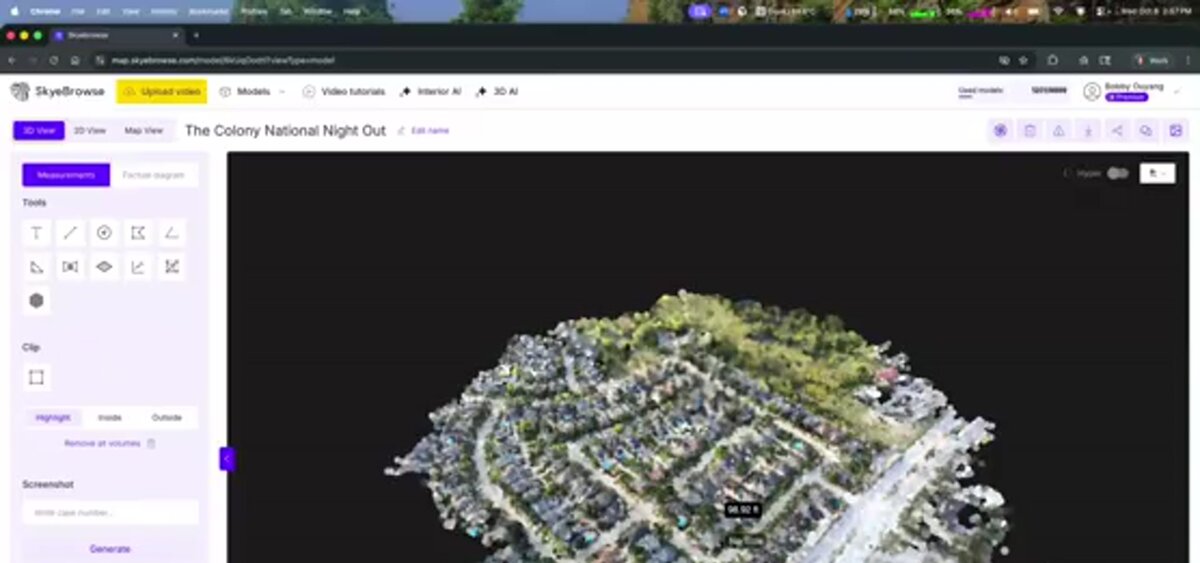
Upload Mavic 3 Pro .MP4 files directly at app.skyebrowse.com — pair the video with the drone's .SRT telemetry log for automatic georeferencing. SkyeBrowse's videogrammetry engine extracts frames, matches features across overlapping frames, reconstructs 3D geometry, and generates a textured mesh, point cloud, and orthomosaic — all in the cloud. No desktop GPU or photogrammetry expertise is required. Processing typically completes within a few minutes for small scenes.
The SkyeBrowse workflow removes the technical barrier that traditionally kept consumer drone operators from producing professional 3D outputs. Standard photogrammetry software — such as Agisoft Metashape or Pix4D — requires the user to import individual image frames, tune reconstruction parameters, manage local processing queues, and export results manually. SkyeBrowse handles all of that server-side.
For Mavic 3 Pro users, the process is:
- Complete the mapping flight using the settings and patterns described above
- Transfer the .MP4 video and .SRT file from the DJI Fly app to your device
- Log in to app.skyebrowse.com and upload the .MP4 directly — pair it with the .SRT telemetry log for automatic georeferencing
- Upload both files — the .SRT provides GPS coordinates, altitude, and gimbal angle for each frame
- Select the output tier — the Mavic 3 Pro's Hasselblad 4/3 CMOS sensor captures the detail needed for Premium Advanced processing, delivering 0.1-inch accuracy from a consumer-grade drone
- Download the GLB mesh, LAZ point cloud, or GeoTIFF orthomosaic when processing completes
SkyeBrowse supports the Mavic 3 Pro alongside 1,200+ agency users worldwide. Models are stored on secure cloud infrastructure with audit trails. Outputs can be shared as a browser-based 3D viewer link or exported to third-party CAD and GIS tools. For a detailed look at the videogrammetry process, see our 3D mapping guide.
How does the Mavic 3 Pro compare to the Mavic 3 Enterprise for mapping?
The Mavic 3 Enterprise adds an RTK (Real-Time Kinematic) GPS module option, a mechanical shutter to prevent rolling-shutter distortion on grid flights, and enterprise mission planning via DJI FlightHub 2. The Mavic 3 Pro uses a consumer-grade GNSS receiver and an electronic shutter, which can introduce minor rolling-shutter artifacts at high flight speeds. For most use cases — accident documentation, property inspection, construction progress — the Mavic 3 Pro produces results indistinguishable from the Enterprise when flown correctly at slow speeds.
The key practical difference is RTK precision. The Mavic 3 Enterprise with the RTK module achieves centimeter-level absolute accuracy without ground control points (GCPs), which is critical for land surveying and precise volumetric calculations. The Mavic 3 Pro, by contrast, relies on standard GNSS (GPS/GLONASS/Galileo) with absolute accuracy in the 1–2 meter range — sufficient for visual inspection, incident documentation, and relative measurements, but not for legal boundary surveys.
For Mavic 3 Pro operators who need higher absolute accuracy, adding GCPs (physical targets with known survey coordinates placed in the scene before flight) closes much of the gap — see our GCP vs no-GCP accuracy comparison for a detailed look at when the investment pays off. SkyeBrowse's Premium and Premium Advanced tiers support GCP workflows. The cost delta between a Mavic 3 Pro (approximately $2,200) and a Mavic 3 Enterprise with RTK (approximately $6,000+) is often better spent on GCP equipment and a few hours of surveying for occasional high-accuracy needs.
See our detailed side-by-side comparison of the Mavic 3E mapping setup vs consumer drones for specifics on enterprise features, pricing, and use-case fit. Teams that regularly need survey-grade output from enterprise missions may also want to review the best mapping software for the DJI Matrice 350 RTK as the next step up in accuracy and payload capability.
FAQ
Can the DJI Mavic 3 Pro make a 3D model?
Yes. The Mavic 3 Pro's Hasselblad main camera captures enough detail and resolution to produce high-quality 3D models using videogrammetry or photogrammetry. SkyeBrowse's cloud platform accepts Mavic 3 Pro .MP4 video directly and processes it into a navigable 3D model without desktop software. See skyebrowse.com/supported-drones for the full compatibility list.
What is the best video setting on the DJI Mavic 3 Pro for 3D mapping?
For 3D mapping, shoot in 4K at 30fps using a fixed ISO (100–400 in good light), a shutter speed of 1/60–1/120, and aperture at f/2.8 on the Hasselblad lens. Disable D-Log M for mapping flights unless you plan to color-correct before upload. Keep drone speed slow — under 15 mph — to maximize frame overlap. Always record the .SRT telemetry file for GPS-assisted georeferencing. Our drone mapping software guide covers additional settings for grid and orbit missions.
Does SkyeBrowse support the DJI Mavic 3 Pro?
Yes. Upload Mavic 3 Pro .MP4 files directly at app.skyebrowse.com — pair the video with the drone's .SRT telemetry log for automatic georeferencing. Processing typically completes in minutes, producing a 3D mesh (GLB), point cloud (LAZ), and orthomosaic (GeoTIFF). Visit skyebrowse.com/pricing-premium to compare accuracy tiers.