This drone 3D model flight checklist covers the capture side of a mission: camera settings, GPS subtitle files, orbit and grid patterns, and on-site review. It's built for building exteriors processed with videogrammetry, which reconstructs a 3D model from the frames of one continuous video. New pilots usually shoot in 1080p, repeat the same orbit, move the gimbal mid-flight, or fly jerky. These printable lists fix all four.
Key Takeaways
- Record in 4K, lock the zoom, and turn on GPS video subtitles (.SRT on DJI, .ASS on Autel) so the model georeferences automatically.
- Two orbits that differ in altitude, distance, or gimbal angle beat five copies of the same orbit.
- Set the gimbal while hovering and keep the sky mostly out of frame.
- Sites over about 1 acre need a lawnmower grid first, then two to three orbits and facade passes.
- Upload the video and GPS file together; processing takes roughly 1 minute per minute of video.
Contents
- What Is a Drone 3D Model Flight Checklist?
- Which Camera Settings Should You Check Before Takeoff?
- How Do You Turn On SRT Subtitle Files on DJI and Autel Drones?
- How Should You Fly Orbits Around a Standard Building?
- How Do You Capture a Large Building?
- What Mistakes Ruin a Drone 3D Model?
- How Do You Review and Upload the Footage?
- Should You Use the SkyeBrowse Flight App or Fly Manually?
- FAQ
What Is a Drone 3D Model Flight Checklist?
It's a capture-focused list you run on every mapping flight so the video holds everything a 3D reconstruction needs: camera settings, GPS files, flight patterns, and on-site review. It runs after your safety preflight.
Your drone preflight checklist covers airframe, batteries, airspace, and weather under Part 107. New to the process? Read how to make a 3D model with a drone first. Interior scans use different settings; see the interior mapping tutorial.
Which Camera Settings Should You Check Before Takeoff?
Set resolution to 4K, turn on GPS video subtitles, lock the zoom, clean the lens, and check the light. 1080p footage makes noticeably worse models.
Camera Settings Checklist (Copy-Ready)
☐ Resolution set to 4K. 1080p footage produces noticeably worse models. Check this every flight.
☐ GPS video subtitles turned ON (steps in the next section).
☐ Zoom kept the same. Never zoom during the flight.
☐ Lens cleaned.
☐ Lighting checked: consistent light is best. Avoid harsh mixed sun and shadow, and low light.
A 4K frame holds four times the pixels of a 1080p frame, giving the software more texture to match. Our ground sample distance guide covers how pixel size drives detail. Zooming mid-flight changes the camera geometry being solved, so set it once.
How Do You Turn On SRT Subtitle Files on DJI and Autel Drones?
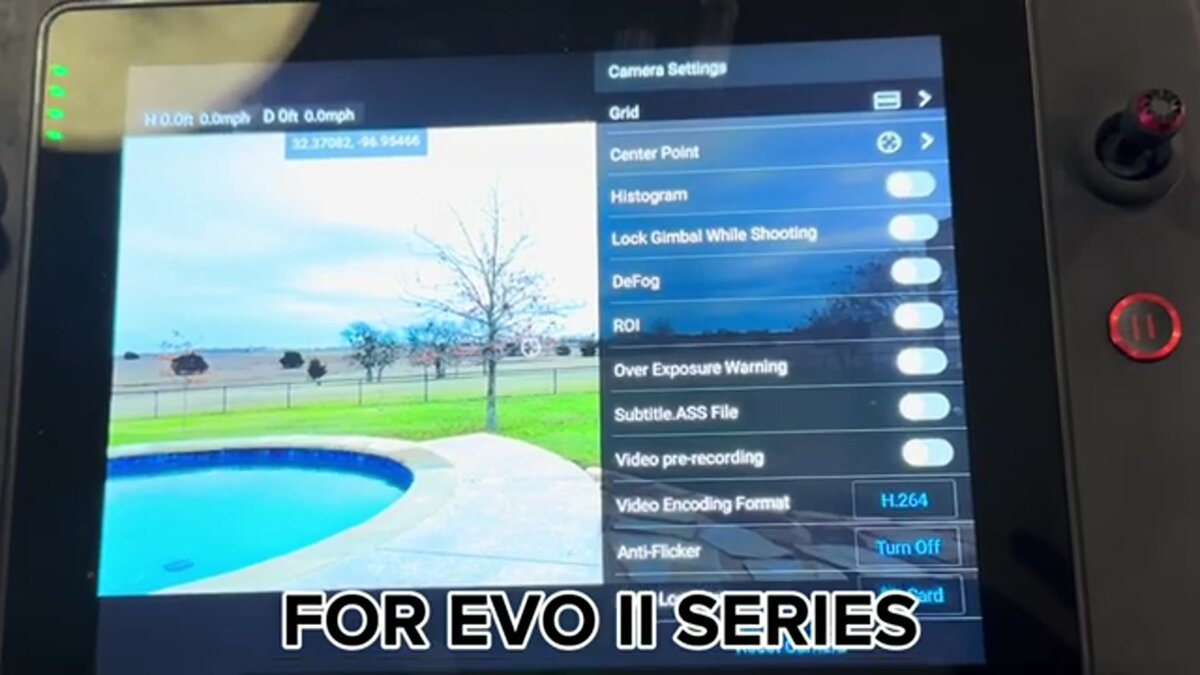
DJI drones can save an .SRT GPS file and Autel drones an .ASS file next to each video. The setting is usually called Video Subtitles or Video Captions. Turn it on once, confirm the file appears on the SD card, and upload it with the video to georeference the model automatically.
GPS Subtitle File Checklist (Copy-Ready)
☐ DJI (DJI Fly app: Mini, Air, Mavic series): open the camera view, tap the three dots in the top right to open Settings, go to the Camera tab, scroll down, and toggle Video Subtitles ON (Video Captions on some models).
☐ DJI Enterprise (DJI Pilot 2: M3E/M3T, M30, M300/M350): open camera settings and toggle Video Subtitles ON.
☐ Autel: enable video subtitles in the Autel app camera settings.
☐ After the flight: copy BOTH files off the SD card, the video (.MP4/.MOV) and the matching .SRT/.ASS file with the same name. Keep them together.
☐ Verify once: after your first flight with this setting, check the SD card for the subtitle file. If it's missing, the setting didn't take.
A DJI SRT file is a small text log of position and camera data synced to the video, which places the model in real-world coordinates. Autel menu screenshots are in our Autel EVO II and Max 4T tutorial.
How Should You Fly Orbits Around a Standard Building?
Fly a high orbit with the whole building in frame and the gimbal about 45 degrees down, then a lower, closer orbit at a different gimbal angle. Every extra orbit must change altitude, distance, or angle. Record it all as one slow, continuous video.
Standard Building Flight Plan (Copy-Ready)
☐ Orbit 1 (high): full circle at a height where the whole building fits in frame, gimbal about 45 degrees down, building centered.
☐ Orbit 2 (low and closer): drop altitude, move closer, and set a steeper or flatter gimbal angle to capture the sides and details missed from above.
☐ Every extra orbit changes something: altitude, distance, or gimbal angle. If two orbits look the same, the second added nothing.
☐ Set the gimbal before you move: stop, hover, set the new angle, then resume. Never tilt the gimbal while flying.
☐ Facades and walls: add a slower pass at wall height facing the facade.
☐ Keep the building centered: move the drone around the subject. Never stand still and pan the camera.
☐ Fly slow and smooth: gentle stick inputs only. If it feels slow, it's right.
☐ Keep horizon and sky mostly out of frame.
☐ Finish by overlapping your starting area before you land.
☐ Record it all as one continuous video.
Our oblique vs nadir capture comparison explains why angled views matter for walls. Orbits still fall under 14 CFR 107.31, so keep visual line of sight when the drone passes behind the building, and 14 CFR 107.51 caps altitude at 400 feet unless you stay within 400 feet of a structure.
How Do You Capture a Large Building?
Condos, apartments, and large commercial buildings need an overlapping lawnmower grid first, then two to three orbits at different heights, then slow facade passes along every face. Anything over about 1 acre gets this treatment.
Large Building Flight Plan (Copy-Ready)
☐ Grid first: lawnmower-pattern grid over the whole building and site, gimbal about 45 degrees down, each pass overlapping the last.
☐ Then 2 to 3 full orbits: one high with the whole building in frame, one at mid height, one lower and closer. Change gimbal angle between orbits while hovering, never while moving.
☐ Facade passes on every face: a slow side pass along each wall at facade height. Tall buildings need passes at more than one height per face.
☐ Size rule: anything over about 1 acre always gets grid plus orbits.
The grid covers the roof, orbits tie roof to walls, and facade passes fill in vertical detail. For full-site work, see our drone 3D mapping page.
What Mistakes Ruin a Drone 3D Model?
The big ones are 1080p footage, identical repeated orbits, moving the gimbal in flight, hovering while panning, jerky motion, too much sky, zooming, and frames filled with glass, water, mirrors, or blank walls. Each removes information the reconstruction needs.
Things That Ruin Models (Avoid These)
✗ 1080p footage
✗ Repeating the identical orbit multiple times
✗ Moving the gimbal while the drone is moving
✗ Hovering in place and panning the camera
✗ Fast or jerky movement
✗ Excessive sky in the frame
✗ Frames filled with glass, water, mirrors, or blank featureless walls
✗ Zooming mid-flight
Depth comes from seeing one point from different positions. Panning from a hover adds rotation with no movement, and reflective or blank surfaces give the software nothing stable to match.
How Do You Review and Upload the Footage?
Before leaving, play back the video and confirm the GPS file saved. Then upload the video and its .SRT or .ASS file together through Universal Upload. Most models are ready in 5 to 10 minutes.
Before You Leave the Site (Copy-Ready)
☐ Play back the video: is it sharp, smooth, and is the building centered throughout?
☐ Confirm the .SRT/.ASS file saved alongside the video.
☐ If anything looks off, re-fly now. A second flight on site is cheap. A return trip is expensive.
Upload Checklist (Copy-Ready)
☐ Go to app.skyebrowse.com and use Universal Upload (works with video from any drone).
☐ Upload the video AND its .SRT/.ASS GPS file together.
☐ Leave the Interior Mapping toggle OFF for building exteriors.
☐ Processing takes roughly 1 minute per minute of video.
Universal Upload runs in the browser. Commercial and Pro models process in 8K at 0.5 inch accuracy, and Public Safety & Enterprise reaches 0.1 inch with 16K Ultra processing. That low, close orbit sharpens detail further. Plans are on the pricing page.
Should You Use the SkyeBrowse Flight App or Fly Manually?
If your drone is on the supported list, the SkyeBrowse Flight App flies the orbit and grid patterns for you. It's the quickest path to consistent coverage. An experienced pilot flying manually with this checklist will still make better models than the automated flight.
It flies two orbits for scenes under about 1 acre and a WideBrowse grid for larger areas. The Mini 2 and Air 2S get orbits only, and Autel automation is iOS only. Check the supported drones list and the Flight App tutorial.
FAQ
My model failed to process. Did I lose a model?
No. A failed model is returned to your balance automatically. Re-upload; if it fails again, check the mistakes list and contact support with the model URL or ID.
Why did my 3D model come out upside down?
Too much sky in the frame or jerky motion causes inverted models. Use the flip tool in the viewer, then tighten your capture technique on the next flight.
Why do my measurements look wrong?
For drone video, confirm the .SRT or .ASS file was uploaded with the video. Forgot it? Re-upload the video with the GPS file. Video without GPS data, such as most phone or GoPro footage, needs the Scale Tool (paid plans) and a known measurement in the scene.
Do I need ground control points for a drone 3D model?
No. SkyeBrowse reaches survey-grade accuracy without ground control points. RTK drones add positional accuracy and a known-size object in the scene is a good check; both are optional. More in our ground control points guide.
How many videos and how large a file can I upload per model?
Freemium allows one video per model and 2GB per upload. Commercial and Pro allow up to 3 videos per model at 10GB each. Public Safety & Enterprise allows up to 10 videos per model at 100GB each.
Can I practice capture technique without using a model?
Yes. On an active Commercial or Public Safety & Enterprise subscription, toggle Practice Model in the upload flow. Practice models don't count against your models and delete after 1 month unless you keep them.
I don't see the measuring tools in the viewer.
Zoom the browser out (Ctrl or Cmd and minus) and they appear. See the SkyeBrowse tutorials for more.